Viewers

I live in a house that is easily more than 100 years old. Living here has taught me that the term ‘this ole house’ is the basis of conversation with the repairman I called last week, rather than a syndicated production. By the generosity of God, I grew up on a farm learning to do all that you can to save paying others to do what you might accomplish. Life has taught me that you are a much better person if you mow your own yard rather than get a job, that pays enough money, that after taxes, you can still afford to hire someone else, to mow it for you, and pay for their weekly service, while you also pay a monthly fee to go to the gym or health club, in order to have a place to exercise.

Think about it……..Bob

Saturday, August 3, 2013

Bird Feeder That Will Last


After making a second Bat House, I got a 16 ft., 4x4 treated post and placed this one so that it overlooked my driveway and parking area.  After attaching the Bat House and setting the post, I thought I was finished.  I went in the house, sat down in my recliner, and turned on the TV.  From this chair I have a window just to the right of the TV that I can see the trees outside and watch for squirrels.  When I looked out this time I was surprised to see that I had set this new post about 10 feet from the house but it was right in the middle of the window, and would obstruct my vision of the trees.  I was very disappointed, but not about to go back out and move the post.  So I did what some call "when life gives you lemons, just go make lemon aid".  In this case I pondered "what can I do to change this, because I hate where I placed that post".  After much thought I decided to mount a 1/2 in. dowel on the post so birds might land there and I would be able to observe their beauty.  Well that lasted about 2 weeks and finally I realized that the birds were not going to just flock to the roosting position without some type of incentive.

The best incentive would definitely be food.  So I decided to place a bird feeder on the post.  My younger daughter had been in a summer workshop and as a project, they made bird feeders.  I love the design and decided to use it as a model.  The only problem with the one she made was that it had a wooden piece that you would turn to the side to fill the seed.  After many years that 2 in. square piece of wood fell off and needed repair.  I also noticed that the wooden roof of that feeder was deteriorating from winter, summer, rain, and sun.  So I got out my aluminum roof flanging and made a top for the feeder with a sliding piece to allow the filling with seed.


This is what I wanted to copy for my new bird feeder, with some adjustments.  I wanted a larger capacity so I made it a bit wider.  I wanted a longer life, so I used barn cypress and a fully fitted metal top.  So after I took all the measurements of length, width, and angles, I started my new feeder. 

The first thing I did was to make a template for the sides with notes on it for angles, holes to drill, size, and other helpful information.


 Then I started on the bottom by cutting a piece  6 1/2" x 8".  Next I wanted the lip around this bottom to be about 1" tall and only 1/2" thick, so I cut enough stock to make these pieces.  I wanted the birds to be able to grip the top of this lip as they would a rounded branch, so I needed to round over the top.  To do this I made a jig for my band saw.


I took a piece of 2x4 to my table saw, tilted the blade to a 45 degree, adjusted the height, and made the first cut close to one edge.  Then I turned the piece around and adjusted the fence so as to complete the second cut and make the "V" that I wanted.  Next I used my band saw to cut out a rectangular opening where the blade will be positioned.  Now I clamped that to my band saw and positioned it so I could chamfer the corner edge on both sides of the top of the lip pieces.

 
Next I took those pieces to my bench top belt sander to round over the top.
Now I was ready to cut the ends to length with 45 degrees and glue them into place.

 
All glue used on this project is Gorilla Glue.  It is a polyurethane glue and will not deteriorate from rain water.
 
Next I cut the sides.  Each must be 5 1/2" wide and 8" tall, with the slope for the roof at 25 degrees.  After I ensured that the two were precisely the same dimensions, I set the miter gage for the table saw for 12 1/2 degrees.

I set the blade of the saw so that it would cut a depth of only 1/4".  Then very carefully I lined up the piece with the blade so it would be just inside of the top corner and cut a groove from top to bottom.


  I flipped the side around and aligned the corner with the blade again to make the cut for the other groove.  The same process applies for cutting the two grooves in the other side. 


Now the grooves are ready to accept the plastic rectangles and the sides are ready to attach to the bottom.


I carefully centered the sides on the 8" length of the bottom so that they are only 6 1/2" apart and marked the position, then glued the sides to the bottom.

 
Once the glue had set for about an hour, I used my countersink drill bit and predrilled holes for 2 - 2" decking screws on each side.


Next I cut two pieces of plastic 6 7/8"x 5 1/4" on my table saw.  These will slide down in the grooves on the inside of the sides.  Making sure that they will fit and not bind in the grooves, I placed one in and marked where the bottom of that plastic piece made contact with the top of the lip.


Then I took my mallet and a 1/2" chisel and notched the lip until the plastic would slide down low enough that the top was even with the top of the side where the groove held that piece of plastic.  I noticed that there was an opportunity for the seed to accumulate in the trench created by the rounded lip and the side piece, so I used the chisel to remove the wood between the two notches for the plastic.


This I made into a slope of about 30 degrees so the seed would track away from the side as the level dropped down and the feeder became empty of seed.


Then I placed a piece of wood on the top just to ensure that the top of the plastic would not be in conflict with the roof.  Now before I put the top on the feeder I must complete a few 'get ready' things.  From a wire coat hanger I cut two 10" sections that will be installed for the hanging harness.

 
Each of these have an end that will prevent them from pulling through.  I used my needle nose pliers and after gripping the wire perpendicular to the pliers, I wrapped the wire around the pliers so as to make a full circle.  Then I bent the wire perpendicular to that circle.


These wire pieces will go through holes near the peak of the roof and must be installed before the roof goes on the feeder.

Now I can cut the two pieces of 1/2" plywood for the roof.  These are 10" x 7" each.  The 10" run from side to side.  One of these will have the fill hole for seed.

 
This hole will be 1 1/4" x 1 1/4", centered from side to side and 1" from the top.  I drilled a 1/4" hole and used my Jig Saw to cut the square.
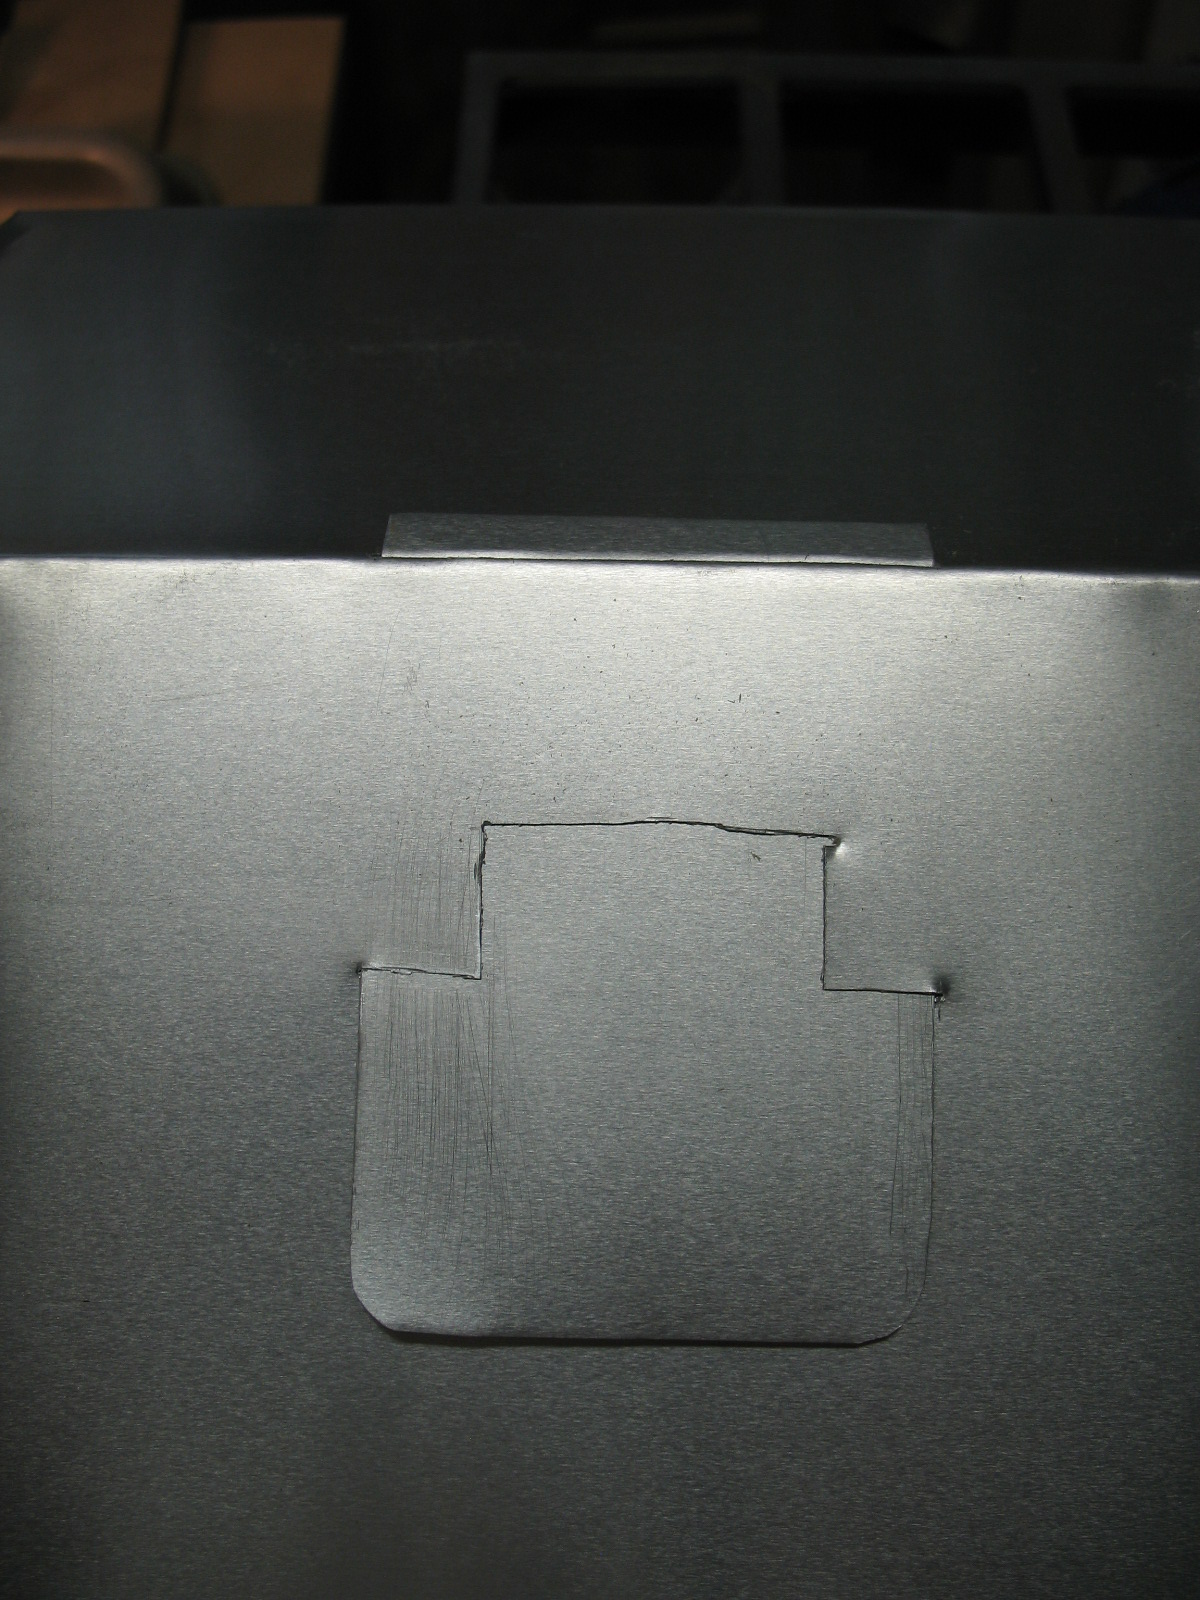

After I cut the square out, I realized that I needed to match this position in the metal top, so I added this to my template as a guide for later. 


Also I had to tilt my table saw blade about 32 degrees to trim the top edge of the roof.  This will make the two sides have the correct angle and prevent a gap across the top ridge.


Now I put glue on the top of the sides and attached the roof with two 1 5/8" decking screws.  Be sure to dry fit the roof pieces so that the ridge will be in the best alignment.  I also bent the two wires slightly just to prevent them from sliding back into the interior of the feeder.

I used a piece of aluminum roof flanging 20" wide to cut the piece for my top cover.  This piece should have a 1" extra boarder to allow the bending which is how it is attached to the feeder.  Final measure for my feeder was 16" long and 12" wide.  Using my awl, I marked lines 1" from the edge on all 4 edges.

 
Next on one of the 16" sides, I cut the corners with a tab to fold inside when the metal in fitted to the top.  Be sure that the tab is hinged on the 12" side.  This will make the tab fold so that it lays against the longer side and this will prevent the tab from causing you problems when you slide the feeder in and out of the folded sides while fitting and bending.


Now I can make 90 degree bends on one 12" side and the 16" side with the corners cut.  This will look like the start of a pan when it is finished.  Place the feeder, upside down, into this pan and snug it to the corner with the two raised edges.  Now carefully tilt the feeder onto the other area and ensure that the line is accurate for the folding of the other edge on that side.  It could be slightly over or under the original 1" mark and should be adjusted as needed so the top will fit as snuggly as possible.  I also marked the point at each end of the ridge so I know where to cut and bend for the ridge.  Next I remove the feeder and bend a 90 degree on the opposite 12" side.

 
I made an angled cut at the ridge mark so that when I bend the ridge, the edge will not cause problems.

 
I used a 1/2" piece of plywood to position in the corner so I could complete the second 90 degree bend on the part of the metal that wraps under the roof.  This I did on one of the 12" sides and half of the 16" side.  When this was completed,


I once again placed the feeder upside down into the metal and checked the fit, as well as the markings for the ridge.  I removed the feeder and made the bend of about 50 degrees on the ridge line.  Now I placed the metal back on the feeder and checked the fit.  At this time, before the top is fully attached, I need to cut the square into the metal that will match the filler hole in the wood roof. 


This is when the template really helps.

 
After I mark the square, I use my DREMEL tool with a cutting disk.

Once I am satisfied with the metal and the fit, I am ready to complete the bending for the rest of the edges.  I placed the feeder in the metal upside down and worked around the other edges bending and tapping with my 90 degree edger (same one I used for the roof on the Bat Houses) and my mallet.  Also cutting the corners, ridge mark, and insuring a tight fit.


I cut 1/2" slits on each side of the filler square, and then I cut a piece of metal 2 1/4" by 4".  This will be the slide that covers the filler hole.  Once it is cut,


I round two of the corners, and I used some wide mouth wielding pliers to fold the top over about 3/8" onto itself twice as a handle.


Next I position the slide where it will be located and insure its position.  Then I marked the ridge at both sides of the slide


 for the slot that will allow the slide to be inserted.  This cut is made with my DREMEL tool.  Be sure that you favor the other side of the ridge for this slot.


Now the slide can be inserted into the slot and eased down until it makes contact with the two slots.  If the slide is difficult to mate with the slots, then you might use the wide mouth pliers and just very slightly bend the bottom of the slide upward.


Here you see the slide in harmony with the intended positioning.


At this point the feeder is finished, but I had to make it ready to be joined with the 4 x 4 post.  I cut two pieces of treated wood 3/4" x 1 1/2" about 12" long.  I used a piece of 4 x 4 post to mark where to drill 1/2" holes 1/4" deep.  Then I cut two pieces of 1/2" dowel rod about 4" long and two pieces of 1/2" PVC pipe 3 3/16" long.


I drilled through the ends of the 12" long pieces with a 5/32" bit and into the ends of the dowels, so I could put a 1" pan head screw with a small washer that will secure the ends of that assembly on both sides of the outer dowel.


Next I positioned the assembly to the bottom of the feeder to be sure that it is square and centered, and predrilled the holes for some 2" deck screws.


Now I must make a hanging assembly by first curling the ends of the wires that extend from the sides of the feeder,


and then attaching another wire curled in the middle and hooked on each end.


I predrilled and screwed a 3/8" hook into the post.  Then I found an old pulley and a long piece of 1/4" rope.  Once I attached and secured the feeder to the post, I needed to adjust the hanging device in order that the feeder would rest in a good horizontal position.


This required me to adjust the side closest to the post to be shorter than the other side.


I cut two pieces of 1" x 1" stock.  One was 6" and the other was 8".  This gave me a place to tie the other end of the rope and a take-up reel for when the feeder is raised to the maximum height.


As a last minute effort I made a 16" length from 1" x 1" stock and rounded the outer ends as a dowel for a perch stick for the birds.  This I mounted under the bottom of the feeder.


Now the bats and the birds will share the same post.  Bat house faces one direction and the bird feeder faces the other.


There have been no complaints from the birds, as of yet.

Good luck, Bob


A HELPFUL ADDITION:


 After I finished my feeder and once the birds got acclimated to it, I realized when I went out to fill the feeder the second time that there was no table or place, other than the ground, that I could put the bird seed that I was holding in my hands.  I could not even use my hands to let the rope out that allows the feeder to descend down to my level where I could fill it again.


I got this plastic filler from a garden center.  It is kind of like a funnel but has a sliding piece so you can fill it with seed and then once you put the small end into the filler hole, you pull the sliding piece and it allows the seed to fall down into the feeder.  My problem was that I had this full of seed and as you can see this can't be set down because it does not have a flat bottom. 


So I cut a piece of treated 1 x 6 board about 8 inches long, cut a square hole in one end, centered, about 2 inches from the end.  This I attached to the post with a couple of hinges.


Next I added another 1 in. piece across the end which will butt to the post and support the board when it is in the horizontal position.


I added an eyelet to the post, and a small hook on the board so this shelf can be raised and held in the vertical position when not needed.


When I lower this shelf, I can set the plastic filler and the extra coffee can, both full of bird seed, and my hands are free to lower the feeder.


Set the filler in the feeder, pull the plastic slide, and when this is empty I can pour the seed from the can into the filler to complete the filling of the feeder.

Hope you enjoy this and love watching the birds......


A few of the visitors to my feeder:


I even made one special for my neighbor:


Hope this gives you good ideas.....

Bob

Tuesday, June 18, 2013

Bat Houses - plans and guide

My home had a swimming pool in the back yard when I bought the property.  It was an "Esther Williams Pool".  It was about 35 ft. long and 15 ft. wide, constructed of California Red Wood 8 quarter stock, and had a vinyl liner fitted within.  The design was a combination of above ground with a diving pit.  Half was 4 feet deep and the other end had a diving pit another 4 feet deep.  It was constructed with a concrete base and plywood sides 4 feet tall topped by a red wood deck that was about 4 feet wide and went all the way around.  After dismantling and removing the structure, I was using the pit to burn yard trash and trying to fill the thing with plaster and lathes from the house during the restoration.  After 20 years, I finally decided to make it a Kio and Gold fish pond.

This has raised the back yard mosquito population greatly.

Not wanting to pour chemicals in the pond to affect the mosquito larva, I finally decided to add a natural predator of the mosquito - the bat.  I searched the internet and found many things to be aware of and how the bat house should look, but nothing really nailed it down or showed me in detail.  So here is how my experience has progressed.


FIRST THING TO REMEMBER IS THE ORDER :  Build the bat house first and then mount it onto the 4x4 post BEFORE you set the post.  Also if you want the post to have a finial on top, then mount this onto the post also, before you stick the project into the post hole.  It is no fun trying to do this while up a ladder about 10 feet off the ground.

Because I have a pledge to trees, I try to never throw away any wood.  If it is too small or damaged, or knotty, or anything... it will help start a fire in the stove this winter and I will be glad I have it then.  A friend made some book cases for a judge and had some barn cypress end cuts that he gave to me about 20 years ago, because he knew I would find a use for them.  So I checked and found two suitable boards 12 3/8" wide and 41" long.  They were rough cut and had never been planed, so thickness was 7/8".  This would do very nicely and it gave me the ability to make the house with two chambers.

I went to LOWE'S and got :

a 12 ft. 4x4 treated post (and wish I had gotten a 16 ft.)
a piece of 1/2" plywood both sides sanded ( 2 ft. x 2 ft. )
a tube of caulking
a can of flat black spray paint
a very small can of polyurethane
a piece of aluminum 8" wide and about 24" long (normally used for roof flanging) to make the roof
you will also need just about 12 - 1 5/8" dry wall screws
about 30 - 2" dry wall screws
2 -  3 1/2" decking screws
and 2 - 1" pan head screws to anchor the roof to the house.

With the first board I decided to have 1 1/2" at the top of the back in order to put a screw through for mounting onto the post, and a 2 1/2" bottom extension that also gives a place to put a second screw for mounting, as well as an area for the bats to land as they enter the house for the day time hours.  This left 37" to divide by two and get 18 1/2" for the box front and resulted in a 22 1/2" back.  Here is a side view of the design:


Here is the bottom to show the chambers.


I cut the plywood 12 3/8" x 18", being careful to have the face grain of the piece running horizontal rather than vertical.  This is because of the grooves that will be cut into the face.  If the grain were running vertical, then the grooves will be perpendicular to the grain and might result in the deterioration of the surface when the bats climb around inside since the surface might chip off and fall out.

The next thing is to cut the groves.  These groves are recommended to be about 1/16" to 1/32" deep, and only the width of your saw blade.  Space them 1/2" apart and be sure that they will be horizontal after the box is complete.  This will result in a ladder effect for the bats to use while climbing around inside.  These groves must be on both sides of the plywood, the back side of the front board, and the front side of the back board.


I made my spacers 1" wide so that allowed me to start the groves 1 1/2" down from the top of the plywood and also the back side of the front board.  On the face of the back board the first grove is 3" down from the top.


These groves are the most time consuming part, but must be cut all the way from the first one down to the bottom of each piece.  The groves at the bottom of the back board are for the landing pad for when the bats are gaining access to the chambers.

With these three pieces finished, you should now use the black spray paint to coat the inner surfaces.  I made the mistake of realizing they were not painted after I finished my project.  I had to spray the chambers like crazy.  Even then I had to tape an arts paint brush to a 2 ft. stick so I could paint the inside surface of the spacers at the top of the inside...no fun.

I used the second piece of cypress to cut a 17 1/2" long piece, then I ripped 6 - 1" wide pieces from that.  Two of these I cut to be 12 3/8" long and the other four remain 17 1/2" long.  Inspect the spacers and determine which of the 7/8" sides will be the surface on the inside of the chambers, then use the spray paint to coat that single side in preparation for the assembly.

Now in my assembly you will notice that I forgot to spray paint before I put the house together, not advised.  If there is a trick to the assemble, you should start with the front board positioned with the outside face down on your table, and the grooved side facing up.  The reason for this is that after you finish your project,  the front will not have the screw heads showing, they will all be in the back, as you will see soon.  Your first attachment is one of the two shorter spacers.  Place it at the top and run a bead of caulk the entire length and near the outer edge.


Now flip it over and use some clamps to squeeze it snug to the board for attachment.  I use a counter sinking drill bit for a 1 5/8" dry wall screw and put three across the spacer, then add the screws.  Make sure the head of the screw is slightly below the surface so it will not be in the way for the next layer to be attached.


The same process is used to attach the side spacers with extra caulk added where they will butt up to the piece across the top.  After each spacer is added, I ran my finger down the side to spread out the caulk that is squeezed out. 


Just for safety, dry fit the plywood on the spacers to be sure of positioning.  I ran a bead of caulk around the outer edge of the spacers that had just been attached in preparation for the plywood, add the plywood and clamp.  Next I added the other shorter spacer at the top making sure as to how it was to be attached and with the bead of caulk added.  I removed the clamps at the top holding the plywood in position, placed the spacer, and then clamped that piece.


Here I will use 2" dry wall screws to go through the new spacers and the plywood into the first spacers, and try to not drill where you put the first screws in the first layer of spacers.  Follow this also to attach the two longer side spacers.  I think I put about 4 screws across the top and maybe 5 on each side spacer. 


Now you are ready to run a bead on the outer edge of the spacers and position the back for clamping and attachment.  I clamped a strip of wood across the top of the back board so that when I placed that piece on the assembly I could just butt the top of the assembly to that strip.  Then be sure the sides are flush and clamp the stack tightly.  Drill the counter sink holes for the dry wall screws and use the 2" screws for the final attachment.


Mark the center of the top and bottom edge, then use a 3/16" drill bit to predrill the hole about 1" from the edge for mounting the house onto the 4x4 post.  Here I used a 3 1/2" coated decking screw to attach the house at the top and the bottom.


If you want to dress the post with a finial at the top, now is the time to fit and attach that also.


I went a step further by typing "batman symbol text" on Google and got a bunch of figures to select one for the symbol added to the front.


It was cut out of the extra from the 1/2" plywood used for the divider.  I attached it using polyurethane glue so it will be water tight and painted it to be noticeable.  Not that the bats will be impressed, but when friends see it they will not ask, "why that big box on the pole?"  At this point I applied the first of three coats of polyurethane. 


While that dried, I worked on the metal roof. I used the aluminum to cut and bend a water proof roof for the bat house.  Notice the small triangles at center of each end.


These are not to be bent until the piece is dry fitted to the bat house.  Also there are 4 small circles containing "x" that represent approximately where the holes will be drilled once you dry fit this to the house.  The solid lines are where you cut with scissors, and the broken lines are where you will bend the metal.


SUGGESTION : Download this diagram, print a copy, and cut and fold it before you try it on the aluminum sheet.  That way you will not make a wrong cut or bend....

This should be cut, bent, and dry fitted before you mount the house to the post.  I trimmed two corners and then started to mark my metal. 


Using my table saw as a drawing table I was able to flush the metal to the table edge and then the combination square was similar to a "T" square for the markings using my awl (ice pick).  Large scissors and QuickClamps are also needed. 


 I marked the slot for the screw through the back and the tall "V"s to be cut out as well as the two lengthwise mark as to where I will make the 90 degree bend and the 27 degree bend.
  

Before I made the first bend, I removed the tall "V"s and the screw slot. 

  
Then clamped the metal to the edge of the saw table and with my fingers moving from end to end, I bend about 5 or 10  degrees at a time as I move from one end to the other.  Then back the other way with another 5 or 10 as the metal will allow.  Once I have about as well as I can do with my hand, I use a helpful tool I made that really sets the 90 degree. 


Holding this 4 in. block to the metal and tapping it with my hammer as I move it, will make a very nice bend.  Next I cut the metal at the unbent mark for the side extensions of the sloping part. 

  
Then I re-clamp the metal for the 27 degree bend and this is done with my hands only.  When you dry fit the top to the box you will probably make an adjustment to this bend so that it remains in contact with the front edge of the top of the box.  Now with the top fitted to the box you can fold the side extensions of the sloping part flat to the side and you will be able to tell where to make the bend of the "dog ears" that bend around the back edge.


After that you will see how the parts fit together to give a nice water tight cover.  Snug these pieces together and drill your hole through the two layers of metal about 1/2 in. from the bottom. 

  
Here you see the cover upside down after the holes have been drilled. 


Here it is fitted and ready.


Also I wanted to avoid having an empty cavity where wasp and bugs could nest and possibly make the bats vacate, so on my band saw, I cut a 2x4 diagonally to make two inserts to fit in the area under the metal roof and on top of the box.


Once you have it right and the polyurethane is all finished, then you are ready to mount the house to the post.  Leave the top screw mounting the house to the post just slightly loose so the back of the metal roof can slip down between the back of the house and the post.  Put a bead of caulk running across the top of the box from side to side and set the fillers into that area.


Once the house is mounted to the post and the top screw is not tightened, you can slip the metal top into place and lift the front edge of the metal very slightly while pushing down on the top and using an extension with your drill driver, tighten the top screw and that will hold the metal tightly.   Next fit the metal on the side and add the 1" screw, for both sides.  Remember, the side extension on the sloping top goes first, then the actual side covers and then the screw.


Finally I ran a very generous bead of caulk just under the metal top where it touches the front of the box.  This will also help keep out unwanted pest.


The placement of the post with the house attached is naturally in an open area so limbs and bushes will not make the bats come in for landing on 'a wing and a prayer.'  Mine is right next to my pond because it was suggested in some of my readings that they like a constant source of water.


Another site I found helpful was : http://batmanagement.com/Batcentral/batboxes/whyfail.html

Good luck and do your internet searches for more information on bats and what they need and like before you build your bat house and set your post.