The Great Grill and Best Burner Gets New Life....
Old farm homes of the past usually had a special area or receptacle that was used to burn all the house trash. Many had compost piles for the kitchen scraps, which became potting soil for the garden. The burn pile was just that, or a couple of 50 gallon metal barrels with the tops cut out. Then some others went the whole 9 yards and had a burner built out of bricks and cement, with a pyramid shaped top formed by brick. Ours had a base about 4 feet square with a top pyramid to form the chimney. The opening at the top is approximately one foot square. The sides and back were around 4 feet high and with the pyramid top, it was nearly 6 feet tall over all. Then my dad thought how nice it would be to have a bar-b-que grill attached on the side for cooking outside. This must have been kind of common dual purpose back in the 1940’s or earlier. Today we enjoy the local trash pick-up service once a week, and grill manufacturers like Webber.
Old farm homes of the past usually had a special area or receptacle that was used to burn all the house trash. Many had compost piles for the kitchen scraps, which became potting soil for the garden. The burn pile was just that, or a couple of 50 gallon metal barrels with the tops cut out. Then some others went the whole 9 yards and had a burner built out of bricks and cement, with a pyramid shaped top formed by brick. Ours had a base about 4 feet square with a top pyramid to form the chimney. The opening at the top is approximately one foot square. The sides and back were around 4 feet high and with the pyramid top, it was nearly 6 feet tall over all. Then my dad thought how nice it would be to have a bar-b-que grill attached on the side for cooking outside. This must have been kind of common dual purpose back in the 1940’s or earlier. Today we enjoy the local trash pick-up service once a week, and grill manufacturers like Webber.
In the 1980’s when I purchased my current home, there was a similar dedicated structure about 50 feet behind my back porch. Because I already had a grill and a smoker, I never did anything to repair, or to prevent further decay of, the unit. I always used this unit to burn the limbs and branches that were picked up before I could mow my lawn, but the grilling side was never used for anything other than collecting bricks, cement chunks, or wire found in my yard. Over the years it became more of an eye sore than a grill/burner. So finally I decided to reclaim and refurbish.

Here you can see that the unit was used as a holding area for bricks, old chimney flues, cement blocks, and other junk found in my yard. My house is the original home built on a land grant of 640 acres, so the back yard probably had an out house at one time, and beyond that were crop land and/or pastures. Luckily I have been left with approximately one solid square acre for my current yard around the house. I did not want to remove the structure because it helps when I need to burn yard trash and leaves. So the only answer was to make it a nice and useful accessory to my yard.

I cleaned out the burner side and then the grill area so that I could determine where to start.
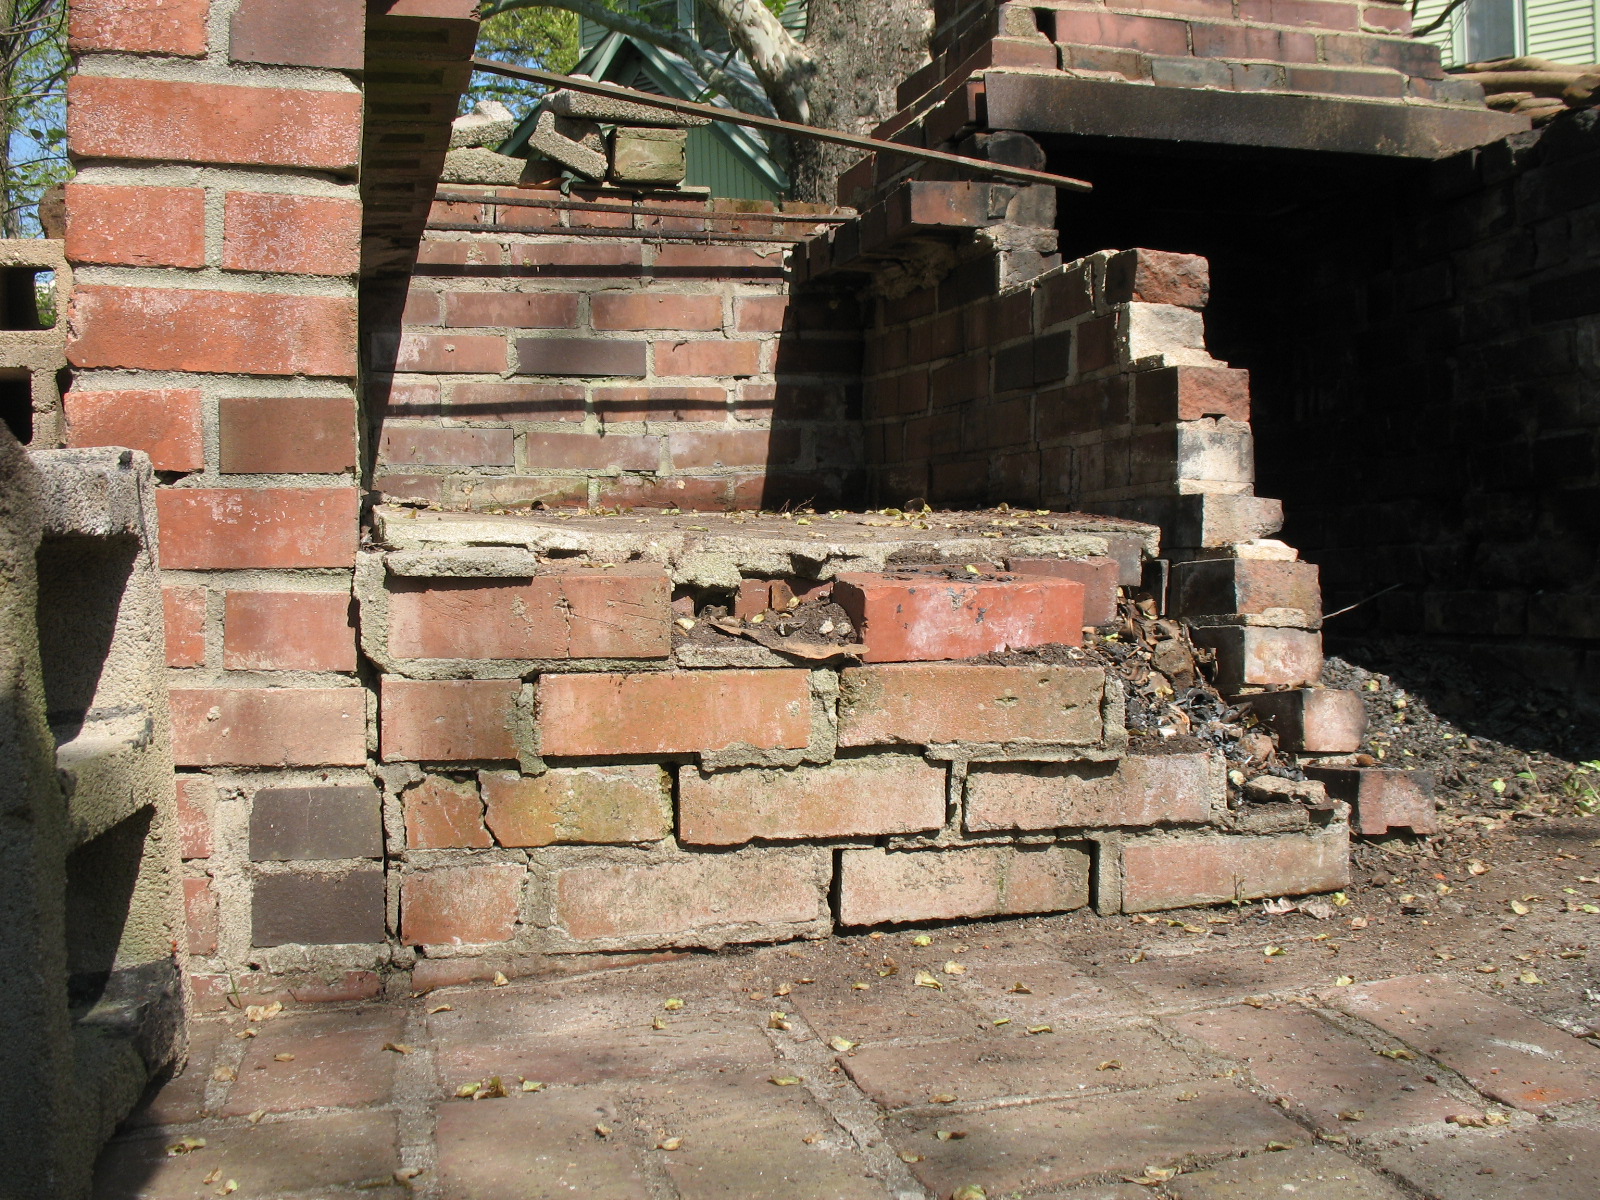
The center wall and the low front wall of the grill side was definitely where most of the work was needed. Both of these were only one brick wide, where as the back and the outer walls were double width. At first I thought I could just fix that and be finished, but this house and property have taught me that any project I start will be much greater and longer than I ever imagined. So I started removing loose brick and loose parts of the thin slab that was the grilling area.

As I progressed, I realized that the area supporting the grill slab had been filled with old dried mortar, bricks, broken bricks, sand, dirt, and gravel as a mixture. Then I realized that an Elm tree only 4 feet away had grown roots under the walls and up into the fill area. This is the real destroyer of the grill area, so I used a hand tiller (claw) to loosen everything and get access to the roots. Once exposed, a hammer and wood chisel allowed me to cut the roots flush at the wall.

The roots were massive, and this took about 3 days of slow work.

Because I prefer to recycle everything possible, I made a frame with a ¼” wire across it to use as a sifter and remove chips of mortar, rocks, and brick chips. The gritty dirt I added to flower beds. The chips of mortar, rocks, and brick chips were used where rain water is eroding the property. All whole and partial bricks were set aside to use for the repair work later.

Finally I had arrived at a starting point to begin my repair. The center wall would have to have another wall beside it to act as stabilizer and to make it double wide, so I needed to clean the side that would join the additional brick wall.

I used Muriatic Acid and a nylon brush to scrub the wall from top to bottom. Then I used laundry detergent to wash the wall after that. The acid is something you do not want to breathe. Because I was in the closed-in area, I did by accident get a couple of breaths of the smell and almost burned my lungs even though this is outside in an open area. Please be careful and realize that a dust mask will not help. You will just have to hold your breath and work quickly, repeatedly.

Next I realized I would need to pour a footing to support the new added brick wall. My footing looks like a really tall ‘L’. The depth is from the ground up to the top of the first brick row. This allows me to add mortar as I start to lay bricks for the support wall.

This is my choice of cement. Mix it in the wheel barrow with your hoe, then scoop it up with your shovel and put it into the form. Just make sure that your form is level from front to back and is set firm and stable on the ground.

The front (short wall) of the grill area appeared to have a good footing so I relied on that to support the double wall I would build there.

I used a pail of water and a wire brush to clean the brick and partial bricks that I had collected to do the repair work. Stacked those on a pallet next to the work area, and as a last effort to do the best job,

I used a small paint brush and a bonding adhesive to coat the side of the center wall that would be laminated by the second wall that I was planning to add.
I made two “L” shaped pieces of wood, added some cork for friction, and drilled holes to accommodate the string that would be the guide for the layers of brick that I would be adding. By pre-drilling two holes in one of the “L”s and push 2 finishing nails into those holes, you will be able to figure eight the string and maintain the tension necessary to hold the “L”s against the brick.

The “L”s make it very easy to give you a reference line from the brick already in the outer walls to align the new center wall.


The “L”s make it very easy to give you a reference line from the brick already in the outer walls to align the new center wall.


I mixed about ½ a sack of mortar at a time because I am not fast enough to use an entire bag before it starts to harden. This worked well for me and gave me a reference period to take a break between each half mixture.
I was surprised to see the project beginning to materialize.

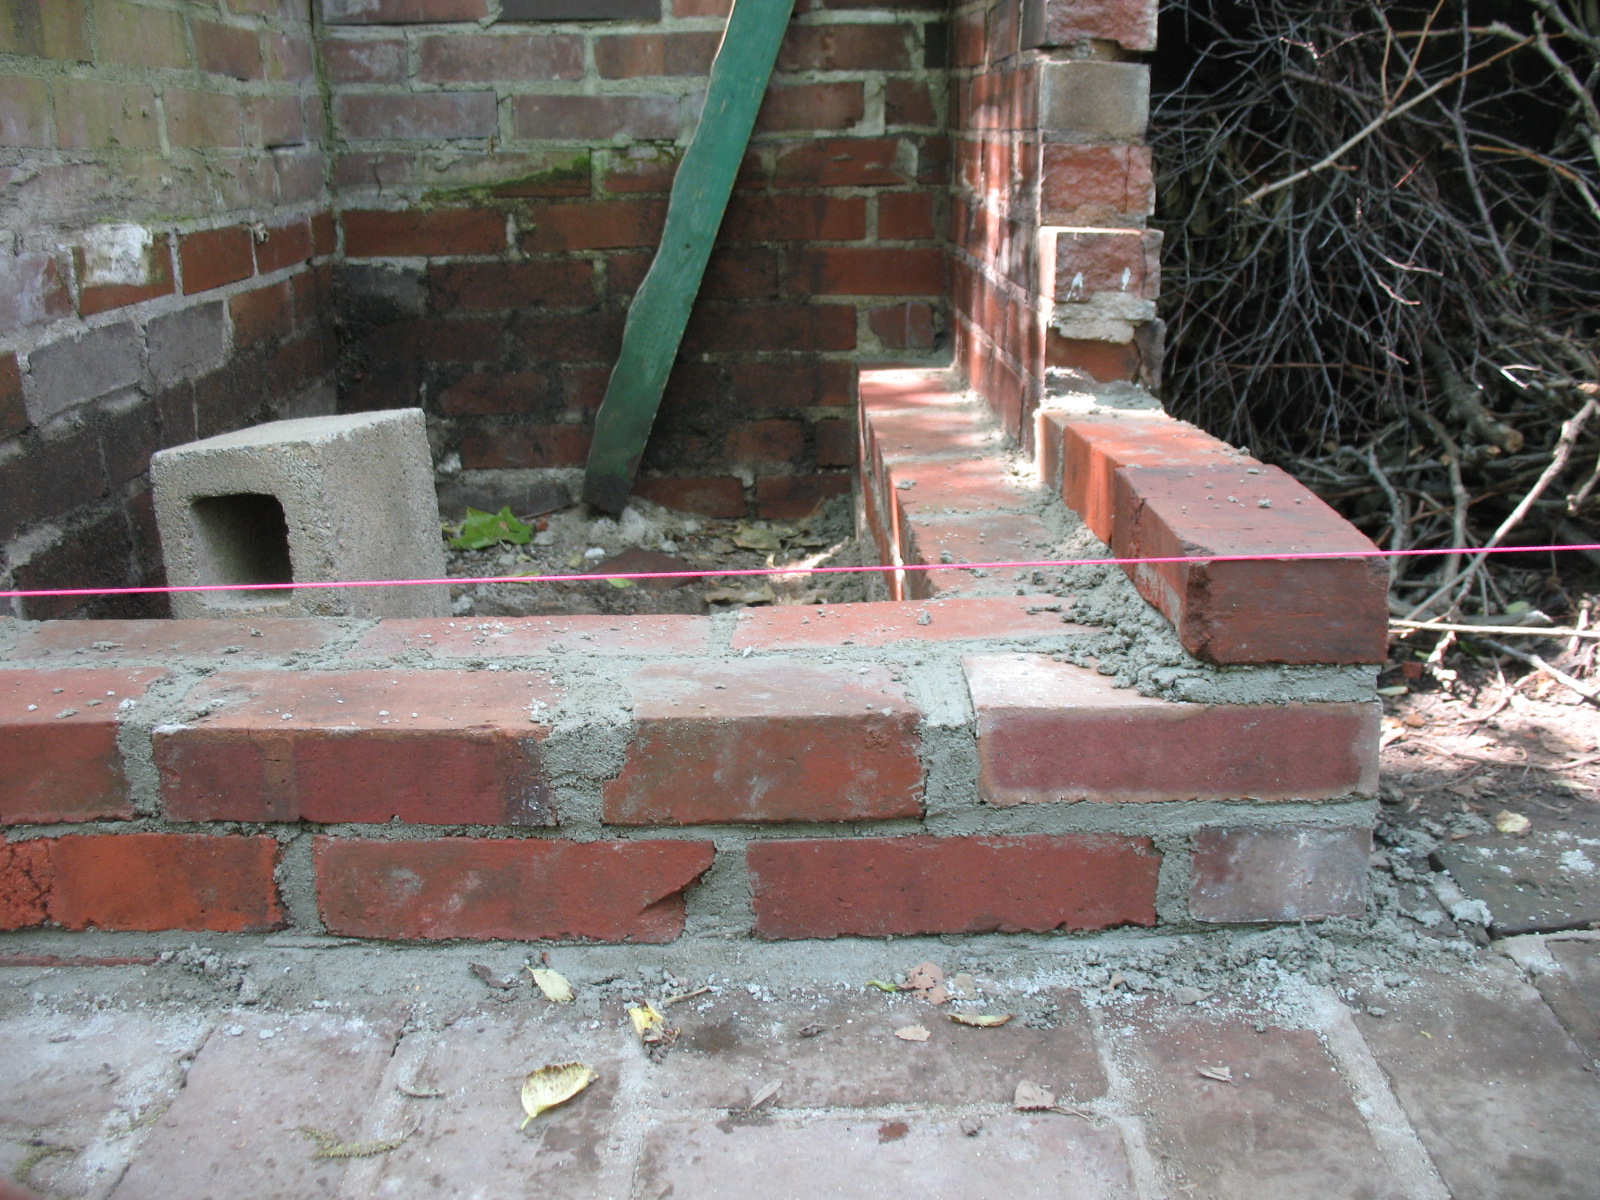
After four layers of brick I had completed the front wall and had tied that wall around the corner and laced to the center wall, along with the new added wall.

End of the second day showed me that my efforts were not professional, but was just the results that I was wanting. You should notice that on top of the left outer wall there is a brick lip sticking out toward the center wall which once supported the grill mesh of the old plan.

The same was true of the left side of the center wall in the back. I thought about trying to use my hammer and remove these, but then I figured I might do more damage to the integrity of the structure than I wanted to repair. Final decision was to leave them and just live with it. Also here, you can see the open gaps in the brick chimney and the angle iron. We will come back to this when I mention how I caulked these areas.

My center wall came out pretty good where I mated the newer portion into the old part. Now it was time to consider what to do about the tops of the walls.

The metal angle iron that spanned the burning side and supported the pyramid top had shifted over the years so I had to clean out between the metal and the brick, then with my hammer I tapped gently to maneuver it back into position. The original walls were capped using mortar and slightly rounding the top. It was at most an inch thick in the center. Years of rain, snow, and freezing had totally deteriorated that and had left no protection at all. I decided to build a form out of 1x6 boards so I could make a 2 ½ inch thick cement cap on top of the walls and back, and also have enough width in my wood sides to press against the brick and remain stable.

I notched the form at the angle iron so that the new cement would prevent the support iron from ever moving forward again.

I made the form to fit as best as possible and ever time I added a new piece to the form, I insured that it was level from front to back, as well as with the parallel member to its side. To hold the form up, I used 1x2’s for legs. To keep the sides from shifting outward, I used QUICK-GRIP clamps. The assembly is joined by pre-drilling holes for the dry wall screws. This will allow me to take it apart the next day with little to no damage to the cement.

I cut some 4’ fence wire that had 2”x3” openings, and fitted them to go inside the forms. This will act as insurance that if the cement ever cracks, at least it will not shift or give up the ghost. Also I took newspaper and rolled individual pages into a twisted rope to stuff down between the form and the brick where the alignment left gaps. The mixture of water to dry cement has to be adjusted for the fact that you want to work it down into the wire and not get the honey comb effect along the inside of the form, but not too much water that allows the cement to run out at the small gap between the form and the brick where the newspaper could not be stuffed.

Once the forms were filled, all I had to do was use a short piece of 1x2 to slide back and forth across the top using the form as support and guides. This will make the small rocks sink and give you a nice layer of mortar on top of the new pour. After about 3 hours I went back and used a trowel to smooth the imperfections.

The next morning I went out and used my drill to remove the screws and expose the cement sides. I was not good enough to avoid the honey comb entirely, and as I peeled the newspaper away from the cement, I saw the need for some patch work. By using Portland cement mixed with water to a pasty consistency and a putty knife, I filled the imperfections and dressed the cement. You can use a spray bottle of water and a finishing trowel should you find any voids or imperfections. Spray well and smooth back and forth, side to side.

Also the edges were very sharp. To ease this you can get a cement edger and slide it along after spraying with water and add a little pressure to get a rounded effect even though you might think the cement has set. Often it is best to do a couple of hours after the pour begins to set and then redress it after the forms are removed.

Since the cement was still damp, I used a small amount of cement to add a slanted cap to the brick lip that was on top of the left wall in order to prevent water from standing. The back of the center wall, from the back corner to the front of the metal angle iron, got the same filling. I let this cure for about a week before starting on the next step. Notice the right outside wall has some evidence of the cement seeping out and running down the brick face. A little water and a brush will remove this easily.
I wanted to have the raised area for the grill side just as it was before, but I did not want it to be filled with dirt. This would only allow new roots to do the same destruction that they had done in the past. So I figured I could use junk I have saved for the last two decades.

I used pea gravel as a bed and just enough to raise the bottom up a few inches and level. I left about 10 inches from the gravel to the top of the new front wall.

Chimneys at one time used a clay liner that is about 9 ½” square and 24 inches long, and once set vertically in place the mason would lay brick around the square clay tubing. When I first started work on my house, I removed an old chimney that was for the original kitchen wood burning stove, and saved the sections.


Strangely enough, they fit just perfectly into the cavity. Four made the support I wanted and then there was a gap in the center that I filled with old brick.


Next I placed a piece of painter’s plastic over that and some thin 3” strips of wood around the perimeter. This will contain the fresh cement and prevent it from seeping through the voids until it starts to cure. Then I fitted another piece of the wire as more insurance.


wanted the front of the slab to extend past the front wall, so I made a long box with a bottom, sides, and front to use as a form. I added a piece of quarter round to create a void so rain water would drip off and not run under and back on the brick face. I put some rubber insulation pieces with “peel off and stick on” to replace the newspaper that filled voids for the wall caps. This worked better.

To position the box, I first attached a 1x2 leg on one end, being careful to position the end at the desired height to leave ½” of reveal of that top row of bricks just above the quarter round. Next I used my level and positioned another leg at the other end. Then I had to use heavy cement blocks as pressure against the bottom of each of the two legs on the ends to hold the box form against the front of the wall and make sure the rubber insulation was compressed. This made the top of the 1x2 legs lean away from the wall, so I used more QUICK-GRIPS and pulled the legs back closer for more pressure.

At the back you will see two vertical 1x2’s clamped to the back wall at the top, and a horizontal 1x2 member just above the wire mesh. The horizontal piece was leveled and will support the end of a 2x4 to sift back and forth after I get most of the cement poured into the slab area.

At the back you will see two vertical 1x2’s clamped to the back wall at the top, and a horizontal 1x2 member just above the wire mesh. The horizontal piece was leveled and will support the end of a 2x4 to sift back and forth after I get most of the cement poured into the slab area.

I attached a short piece of wood to the top of a long 2x4. This extension will set on top of that horizontal 1x2 member and give me the reference, and support the 2x4, that I need to make the slab smooth from side to side. I placed the 2x4 with the top extension into position with the other end extended out and resting on the top of the box form for the lip, placed my level on the 2x4, and raised the back horizontal 1x2 member up until I had about a ¼” slope from the back to the front lip. Again, this is to prevent any water from standing when winter comes and freezes. As I mixed each bag of cement with a hoe and added it into the area with my shovel, I tried to get about ½ the desired thickness (about 3 1/2 " at the thick end against the back and around 2 3/8 " out at the lip) throughout the slab. Then I placed the wire mesh on that and kept adding more cement until things started looking right. With a large rectangular trowel I smoothed the slab after each bag was added and poked edges and pockets to help air get out. As the thickness grew, I used this trowel to scoop and move portions from the lower end to the thicker end. When I thought it was close to right, I put the 2x4 back into position and moved it back and forth only to the extent of the short piece of wood I attached on the end to ride on the horizontal 1x2 member. This gave me a reference for my slope and revealed any high or low spots that needed to be worked with the trowel.


It took 5 – 80 pound bags of cement. I let it set for about 2 hours and then I used more of the same cement to make a slopped outer perimeter on the slab where it meets the brick wall on the sides and back. I added enough cement to make the edge raised about an inch and slope down to the slab, yet only about 2 inches wide, or less, out from the edge. This will prevent any water from getting into the slightest space between the slab and the wall.

Here is the profile of the lip that sticks out front. I wanted to insure that after using this area many times that the rain would not wash the ash, grease drippings, and suit down the slope of the slab, run back under the lip, and down the face of the bricks that are the front of the short wall. Notice that the quarter round formed a drip edge out from the brick just in case the water runs under the lip.

Finally I finished and the unit is ready for trash burning and cooking ribs, or even a whole pig. My nephew even stated that I could get a sheet of metal and lay over the top to create an oven effect. After I finished and let the project rest for a few days, I reviewed the work. As with most of my projects, the smaller problems do not stand out until the major flaws have been corrected. This was the cracks.


Cement, or mortar, will not seal these cracks from future problems.

I got a polyurethane cement caulk from Lowe's and caulked all the cracks.


Also the rounded mortar on top of the pyramid was totally loose and in pieces. I used the caulk as an adhesive under these parts and reset each back into the original position. Then I caulked the brick walls outside and inside. This will prevent the winter rains from getting into those cracks, freezing, and further expanding those problem areas.

Here you will see my finished project with my home made free standing grill. All I have to do is remove the grill, stack about six pieces of fire wood, let those burn for about an hour or so, then replace the grill and add meat. I made this grill to use as a stove to set over fire wood when camping. This grill has 6 legs which are perfect for making the grill stand firm on most any unlevel surface. It is made out of 20 foot pieces of 3/8” rolled steel. I adjusted the dimensions until there were only a few pieces about 1 inch each after the cutting, bending, and wielding. If you are interested in the grill then check it out here in MY FIREWOOD CAMPING COOK STOVE GRILL, “A Real Grill Deal”.
As usual, all tools and supplies for this project are found at Lowe's or Home Depot.